|
Harald Prinzler Mikroelektronik, Fesseldrachen und Fotografie |
Detmolder Straße 93 D-33175 Bad Lippspringe Phone: +49-5252-7830 email: harald@hprinzler.de URL: http://www.hprinzler.de |
Flowform Plan FF05
(Not for commercial use)
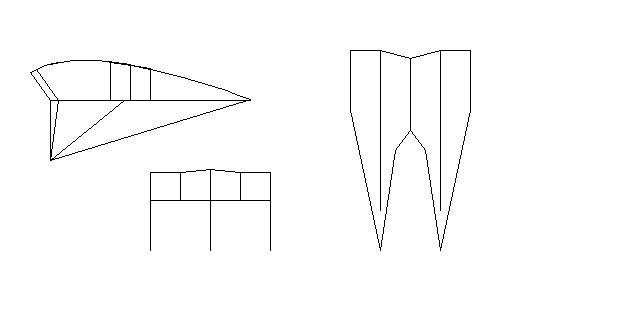
The goal for this Flowform was an appearance like a real molar. That means, the upper and lower leading edge are not straight and towards the trailing edge the kite is smaller and leads in two tips. This kite is made without air flow holes on upper and lower surface.
The body is made of four chambers and three keels. The maximum profile base length of the main profile is set to 100 (per cent) and the spanwidth is set to 60. Depending on the special design of this Flowform the relationship between length and spanwidth is not changeable without new calculations for the profiles.
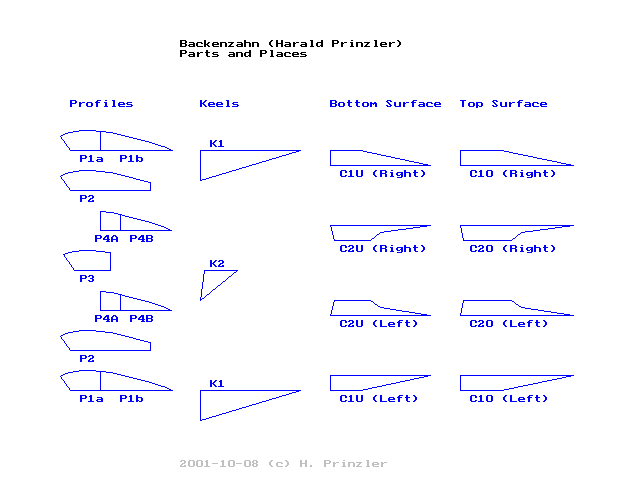
Five different profile pieces are used. The outer profile P1 is made of a straight part (P1A) and a deviated part (P1B) which ends at the trailing edge of the next inner profile (P2). The profile P2 is a bit truncated to solve problems at the trailing edge by closing three profiles. The profile P3 is the center profile and starts at a position a bit back of the straight line of the leading edge to realize acurved leading edge. The profile P4 is used to close the inner sides of both tips and ends on the trailing edge of the profile P1B on the way of the profile P2. The leading edge of the profile P4 is placed inside the chamber C2 to avoid problems with the airstream. Therefore the profile P4 runs straight for a part (P4A) until the edge of the jet chute and for the rest bended (P4B) until the tips of the trailing edge.
Only the inner profiles (P2 and P3) have vents. The positions depend on the lower leading edge of the profile.
Two different keels are used. A shorter keel (K2) is used for the backward placed profile P3 in the center. The leading edge of the center keel (K2) is angular to get the lower keel tips in the same position like on the outer keels (K1). The long keels (K1) are placed under the profiles P1A and the are bended under the profile P1B.
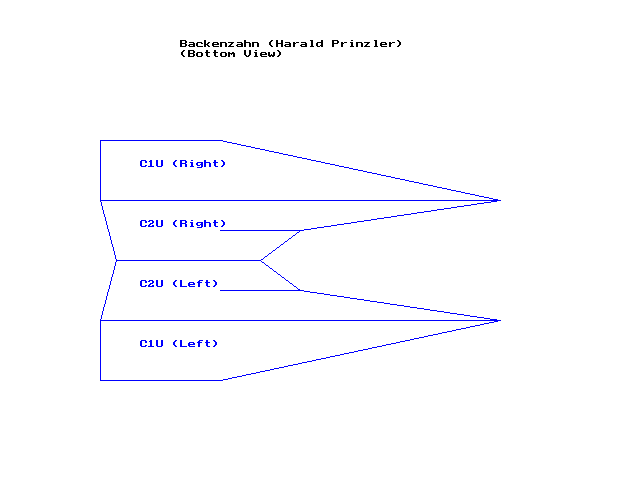
The both inner chambers (C2) are open at the trailing edge for half of the width (jet chute).
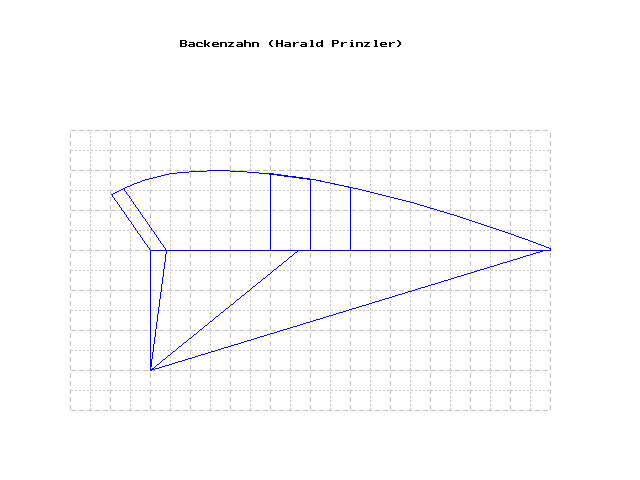
All values are given as X/Y points in a coordinate system in per cent (the profile base line of the untruncated profile P2 is equivalent to 100 per cent). These datas can take place to calculate the values for the chosen size. The maximum profile base length should not exceed 4 metres.
For a kite with about 2 metres spanwidth I used a polyamide line with 1.5 millimetres diameter for bridle lines.
P1      Outer profile, P1A is the straight part and P1B is bended part.
        Two pieces are needed. The profile has no vents.

P2      Second profile from outside, it is the main profile, but a bit truncated
        at the trailing edge. Two pieces are needed. The profile has vents.

P3      Center profile in the middle of the kite. It is placed a bit backward of
        the straight leading edge. One piece is needed. The profile has vents.

P4      The profile to close the roots on the inner side. The profile is placed
        backwards at the trailing edge. P4A is the straight part and P4B is the
        bended part. Two pieces are needed. The profile has no vents.

K1      The keel under the outer profile P1. The keel is bended like the profile
        P1. Two pieces are needed.

K2      The shorter keel in the middle of the kite. It is placed under the center
        profile P3. One piece is needed.

C1      The outer chamber between profile P1 and profile P2. The chamber is more
        narrow towards the trailing edge and leads in the tip of the root.

C1U     Bottom (lower) surface of the outer chamber C1. One right sided and one
        left sided piece is needed.

C2U     Bottom (lower) surface of the inner chamber C2. One right sided and one
        left sided piece is needed. The leading edge is angled.

C2      The inner chamber between profile P2 and profile P3. At the trailing edge
        the chamber is open for the jet chute. The profile P4 is placed in the
        middle of the chamber placed backward from the leading edge.

C1O     Top (upper) surface of the outer chamber C1. One right sided and one left
        sided piece is needed.

C2O     Top (upper) surface of the inner chamber C2. One right sided and one left
        sided piece is needed. The leading edge is angled.

B1      Outer bridle line on the outer keel K1.

B2      Center bridle line on the center keel K2.
Because of the special form of this kite a applicatively procedure for the assembling is mandatory.
Preparing the parts
Cut out all needed parts with seam allowance. Hem all nescessary edges. Cut
the air flow holes on the profiles P2 and P3.
        2x P1
	2x P2
	1x P3
	2x P4
	2x K1
	1x K2
	2x C1U (one right sided, one left sided)
	2x C2U (one right sided, one left sided)
	2x C1O (one right sided, one left sided)
	2x C2O (one right sided, one left sided)
Making the outer chambers (C1)
Sewing together the lower surface with the profiles and the keels from outside
towards the center. All sewings are made from leading edge toward the trailing
edge. Before sewing profile P4 mark the startpoint for the profile P4 on the
bottom surface C2U. All seams are closed inside the chambers.
	Seam: C1U + P1 + K1
	Seam: C1O + P1
	Seam: C2U + P4
	Seam: C2U + C1U + P2
	Seam: C2O + C1O + P2
Making the root of the tooth
Turn the kite inside out. Start the first seam. Then turn back the kite. The
second seam is sewed inside the kite. The tip of the root is automatically
closed.
Seam: C2O + P4
Linking both halves
First sew together the lower surfaces of both halves. Turn the kite inside out
(Take care about the positions of the three pieces). Then turn back the kite.
The second seam is sewed inside the kite.
	Seam: C2U + C2U + P3 + K2
	Seam: C2O + C2O + P3
Finalising the air outlet
Sew a closed seam at the trailing edge from profile P3 towards the profile P4.
Sew on the trailing edge of profile P3 a small piece for reinforcement. If
nescessary sew at the end of the trailing edge (profile P4) pieces for
reinforcement, too.